
The below link describes how to install Virtualbox, Vagrant, Ansible, awscli tool and how to configure awscli on Ubuntu 16.04.
The below link describes how to install Virtualbox, Vagrant, Ansible, awscli tool and how to configure awscli on Ubuntu 16.04.
Post contents:
– What is an iterator?
– Examples
– Pros/Cons
– Cases
https://docs.python.org/2/glossary.html#term-iterator defines an iterator as
An object representing a stream of data. Repeated calls to the iterator’s next() method return successive items in the stream. When no more data are available a StopIteration exception is raised instead. At this point, the iterator object is exhausted and any further calls to its next() method just raise StopIteration again. Iterators are required to have an __iter__() method that returns the iterator object itself so every iterator is also iterable and may be used in most places where other iterables are accepted. One notable exception is code which attempts multiple iteration passes. A container object (such as a list) produces a fresh new iterator each time you pass it to the iter() function or use it in a for loop. Attempting this with an iterator will just return the same exhausted iterator object used in the previous iteration pass, making it appear like an empty container.
More information can be found in Iterator Types.

This is my first late night rant, please bare with me.
So, this topic has been festering in my mind progressively for years now. And until recently I did not really have the time to really sit down and ramble on about it. This theory is not complete on implementation and has many issues, which need to be resolved.
Note: The main technologies that I mention below are real, however the way in which I describe them interacting does not yet exist (that I am aware of).
When I studied Data Structures and Algorithms, I had pasted the definitions, algorithms and proofs of some of the popular and more efficient solutions up on my wall. This was around the year 2000 and I was living in a basement apartment. My thoughts often wandered while I looked at the proofs, thinking that there had to be a better way. My thoughts would take me down a path of deeper abstract and dimensions. So, finally I had thought of a sphere as an abstract model with n degrees (or layers/smaller spheres within. Similar to the Russian toy doll) of complexity of what we now call sharding or scaling; and additionally multiple entry points and paths to the data (this portion of it always sounded great, but I never had worked out the math for such a problem. (quick note: I did wish to use the “shortest path algorithm” for it, but thought it may be a bit premature to introduce it. Routing back then always bothered me as being a real big weak spot for latency. Recently though with cloud computing, you can dynamically call regions, data centers, shards, LBs, servers, databases, , and finally your hash key in order to get a value with a couple lines of code and it would be a fairly straight forward route )
So over the years there has been talk of storage devices being created from nano tech, coffee, Holographic, crystals, and now DNA. I wont get into too many details, but the latest news from DNA research sounds fairly promising. I will say that the last thing I heard was that as of recent 7 grams of DNA would be enough to hold all the world’s data. Here are some of the possible pluses to having this work:
I should probably start explaining what I am carrying on about. Lets briefly define each part to this.
– DNA digital data storage (wiki):
DNA digital data storage refers to any scheme to store digital data in the base sequence of DNA.
– Multi-dimensional access: In terms of data, this means that you need all “n” points of dimensional reference point/s to retrieve the intended-targeted data. So, you plug in 3 points of data and get back one value. This leads into Holographic data storage.
– Holographic data storage (wiki):
Holographic data storage records information throughout the volume of the medium and is capable of recording multiple images in the same area utilizing light at different angles.
– Quantum access: with respect to this theory could range from routes of access, encoding/decoding hashes for data keys as well as data values.
My thoughts: This idea first hit my mind as I had thought about how holographic storage might of worked; that coupled with my original abstract multi-layered sphere concept allowed me to think of this new access arrangement. Also, I would of used multi-holographic in the title, however I am not sure if that tech would be applicable to DNA.
Enough rambling… Here is what I might expect out of this process for this theory:
Creating a Record:
Hope you enjoyed this so far. Please comment and add to this crazyness, more perspectives would probably yield better results 🙂
More to come soon!
1 of many Cassandra (educational) posts to come, hopefully as time allows.
I am new to Cassandra, but definitely not new to databases and Cassandra’s services that make it so interesting. As I learn more, I will create more posts to expand upon everything Cassandra. I have learned way more than what is in this post already and very excited with the idea of sharing this knowledge… so look out for future posts!
There is a great deal to look at under the hood with Cassandra, but lets start with a good foundation. In this post I will be focusing on a break down of Cassandra’s core concepts.
So what is Cassandra? The wiki page states that:
Apache Cassandra is an open source distributed database management system designed to handle large amounts of data across many commodity servers, providing high availability with no single point of failure. Cassandra offers robust support for clusters spanning multiple data centers, with asynchronous masterless replication allowing low latency operations for all clients
This description sounds fantastical, but what does it actually mean? Lets try to break it down into easily digestible chunks. Lets first address all of these industry phrases in bold with respect to Cassandra. I will also touch upon the “Data model” concept at the end.
– This means that data and processes are spread across more than one machine
Great! so the data and processes are spread across many machines, but why do we care? We care because this means that no single machine (or a “node” as it is referred to in Cassandra lingo) holds all the data or handles all the requests. Technically speaking its similar to a load balancing mechanism. Each node is typically configured to house a portion of data (the distributed pieces of this data are known as “chunks”). Additionally, all requests by design are broken up with respect to how the data was distributed.
Now we are getting somewhere. So now if your data or processing gets to large within your environment all you have to do is add more nodes. Additionally, if you need more parallelism, just add more nodes.
Distributed database architectures, built and configured correctly, with respect to Cassandra also means that if a node becomes unreachable that the service itself is still intact and usable. This type of structure is also known to not have any single points of failure.
Finally, if a distributed Cassandra mechanism is well designed, it will scale well with n number of nodes. Cassandra is one of the best examples of such a system. It scales almost linearly with regard to performance as data is added and when we add new nodes. This means Cassandra can handle a ridiculous amount of data without wincing or exponential degradation of performance like most data storage solutions.
A high availability system means that if there is a failure the client will not notice any disruption. This is usually achievable by having some sort of redundancy in place, like additional servers, clusters, or data centers.
First, the term “data center” typically refers to a physical location where servers live, however with Cassandra the term is used a bit differently. Data centers or DCs are more of a designation for a grouping of computers with a directive. So, you could actually have multiple DCs in one physical data center.
Moving forward, multiple DCs indicates, more than not, that syncing or replication data between the different DCs is occurring. Reasoning for having multiple DCs could be, but is not limited to replication, quicker regional access, and separation of data processing. With older data storage solutions replication is typically difficult on many levels, however this is a fairly trivial operation with Cassandra.
Cassandra’s replication service is extremely powerful. The replication architecture is referred to as masterless, which means, yep you guessed it, it has no master. There is also no slave concept either.
Replication in Cassandra is also configurable so that n + m nodes will replicate data, however only m need to be verified first; This configuration is extremely allows for crazy fast responses especially when replication is global. Another helpful feature is that the replication is done asynchronously further decreasing latency when verifying that data has been written.
Cassandra has a three container data model hierarchy, one within another. Here they are, with their RDBMS counter part terms, starting with the outermost and working our way in:
So, this raps up the core concepts of Cassandra at a very high level. I am hoping to turn this into a full set of posts that cover Cassandra at all depths.
Hope you enjoyed this post and perhaps learned something. If you find any of the information incorrect and/or out of date, then please comment.
Thank you

This is what I had to do to get my rig up and running with proto buffers:
Then bend it to your will 🙂
Also see the Python Tutorial to get started using it!
Enjoy!
One of the great Features about Kubernetes is that you can try it out locally on your computer at home. The package name we use is a little difference and is really meant for local development purposes.
Here are the steps I used to installl Minikube on Ubuntu 16.04.
sudo apt-get update -y && sudo apt-get docker.io
curl -Lo minikube https://storage.googleapis.com/minikube/releases/latest/minikube-linux-amd64 && chmod +x minikube && sudo mv minikube /usr/local/bin/
curl -Lo kubectl https://storage.googleapis.com/kubernetes-release/release/$(curl -s https://storage.googleapis.com/kubernetes-release/release/stable.txt)/bin/linux/amd64/kubectl && chmod +x kubectl
Installation Done!!!
Now Lets do a little test.
minikube start –vm-driver=virtualbox
kubectl cluster-info
Output: Kubernetes master is running at https://x.x.x.x:xxxx
minikube dashboard
Create the following folder and file structure
├── Dockerfile
├── html
│   └── index.html
FROM nginx
COPY html /usr/share/nginx/html
<html>
  <head>
    <title> Test Page Title... </title>
  </head>
  <body>
    <h1> Test page body </h1>
  </body>
</html>
eval $(minikube docker-env)
docker build -t testdoc:v1 .
Output:
WARN[0000] Unable to use system certificate pool: requires building with go 1.7 or later
Sending build context to Docker daemon 3.584 kB
Step 1/2 : FROM nginx
latest: Pulling from library/nginx
e7bb522d92ff: Pull complete
6edc05228666: Pull complete
cd866a17e81f: Pull complete
Digest: sha256:285b49d42c703fdf257d1e2422765c4ba9d3e37768d6ea83d7fe2043dad6e63d
Status: Downloaded newer image for nginx:latest
—> 3f8a4339aadd
Step 2/2 : COPY html /usr/share/nginx/html
—> 29320171ac73
Removing intermediate container cb79431be6d5
Successfully built 29320171ac73
Successfully tagged testdoc:v1
kubectl run testdoc –image=testdoc:v1 –port=80
Output:
deployment “testdoc” created
kubectl get deployments
Output:
NAME DESIRED CURRENT UP-TO-DATE AVAILABLE AGE
testdoc 1 1 1 1 1m
kubectl expose deployment testdoc –type=LoadBalancer
Output:
service “testdoc” exposed
kubectl get services
Output:
NAME TYPE CLUSTER-IP EXTERNAL-IP PORT(S) AGE
kubernetes ClusterIP 10.96.0.1 <none> 443/TCP 1h
testdoc LoadBalancer 10.108.233.37 <pending> 80:32498/TCP 10s
minikube service testdoc
Output:
Opening kubernetes service default/testdoc in default browser…
# browser window should pop up at this point showing a url like this and displaying the index.html contents that we set earlier.
http://192.168.99.100:32498/
minikube stop
Remember that a good portion of the Minikube cluster is already created, so we only need the following:
minikube start –vm-driver=virtualbox
minikube dashboard
eval $(minikube docker-env)
kubectl get services
minikube service testdoc
FYI, Minikube is a lightweight version meant for local development and has features that can link your local environment to your production Kubernetes environment, allowing for local testing to be done, while leveraging production services, and then pushing those local builds to production.
Please leave questions or comments below. Hope this helped.
I will try to create an Ansible version soon.
Installing Airflow via Bash onto Ubuntu 16.04 LTS, for EC2; specific resource: (HVM)/ami-f4cc1de2
There are 3 parts to this since the editing of Postgres is manual for this example.
Part 1:
# aws – ec2 – ubuntu 16.04 LTS
# (HVM) / ami-f4cc1de2
HOSTS_FILE=”/etc/hosts”
PUBLIC_ADAPTER=”eth0″
echo “Add appropriate mapping for local IP, since EC2 instance. So if IP = 172.30.1.5, then…”
echo “172.30.1.5 ip-172-30-1-5 >> $HOSTS_FILE”
echo “”
echo “Attempting to add IP to Hosts file…”
IP=$(ip addr show $PUBLIC_ADAPTER | grep “inet\b” | awk ‘{print $2}’ | cut -d/ -f1)
EC2_IP=”${IP//./-}”
HOST_LINE=”$IP ip-$EC2_IP”
echo “Adding ‘$HOST_LINE’ to $HOSTS_FILE”
echo “$HOST_LINE” >> $HOSTS_FILE
cat $HOSTS_FILEsudo apt-get update -y && sudo apt-get upgrade -y
sudo apt-get install -y unzip build-essential libssl-dev libffi-dev python-dev libsasl2-dev python-pandas python-pip
sudo apt-get update
sudo apt-get install postgresql-9.6echo “(Edit File) sudo nano /etc/postgresql/9.6/main/pg_hba.conf”
echo “Since new install, comment out or remove all lines within the file.”
echo “And replace them with:”
echo “# TYPE DATABASE USER ADDRESS METHOD”
echo “local all postgres peer”
echo “local all all peer”
echo “host all all 127.0.0.1/32 md5”
echo “host all all ::1/128 md5”
Part 2 (so now actually edit the pg_hba.conf file as described in the last section of the above script)
Part 3:
sudo service postgresql start
# upgrade pip itself
sudo pip install –upgrade pip
# added to overcome a potential error
sudo pip install cryptography
### if virtualenv is needed
#suod pip virtualenv virtualenvwrapper
#mkvirtualenv airflow
#workon airflow
export AIRFLOW_HOME=~/airflow
sudo pip install airflow
### if error “error trying to exec ‘as’: execvp: No such file or directory” ###
# apt-get install binutils
# apt-get install gcc
# apt-get install build-essential
# pip install pandas
### and retry pip install airflow
#
### If the problem persists, uninstall the packages listed above and reinstall. Then rerun.
# added because of “ImportError: cannot import name HiveOperator”
sudo pip install airflow[hive]
sudo pip install airflow[crypto]
sudo pip install airflow[postgres]
sudo pip install airflow[celery]
sudo pip install airflow[rabbitmq]
airflow initdb
airflow webserver
# The following tutorial worked at this point
# https://airflow.incubator.apache.org/tutorial.html
And Here is the actual script(Warning: Postgress pg_hba.conf update is not done automatically in this script):
Disclaimer: I provide this information as an example of what can be possible. Use at your own risk.
This post is for all those people who, like me forget to write this stuff down.
Just purchased another Raspberry Pi 3 and am wanting to turn it into a media center, so I purchased the following:
and here are my specs:
I will be running the following commands on my Ubuntu box to prepare the SD card for the Raspberry Pi.
So the first thing I want to do it backup the SD card that came with the CanaKit.
we are looking for the SD card within our system
$ sudo fdisk -l
.
.
.
Disk /dev/sdg: 14.7 GiB, 15716057088 bytes, 30695424 sectors
Units: sectors of 1 * 512 = 512 bytes
Sector size (logical/physical): 512 bytes / 512 bytes
I/O size (minimum/optimal): 512 bytes / 512 bytes
Disklabel type: dos
Disk identifier: 0xd0ab1579Device Boot Start End Sectors Size Id Type
/dev/sdg1 8192 30695423 30687232 14.6G c W95 FAT32 (LBA)Highlighted in red is the device I am looking for /dev/sdg1 , now I can unmount.
$ sudo unmount /dev/sdg1
And now backup as an image
$ sudo dd if=/dev/sdg1 of=/media/user/Drive/pi3_noobs_2017.img bs=4M
30687232+0 records in
30687232+0 records out
15711862784 bytes (16 GB) copied, 1263.58 s, 12.4 MB/s
To restore, assuming the SD card is /dev/sdg1 again, use the following command:
$ sudo dd if=/media/user/Drive/pi3_noobs_2017.img of=/dev/sdg1 bs=4M
Side-related-note: this might work as well for backup…
cat /dev/sdg1/ > /media/user/Drive/pi3_noobs_2017.img
I have found a x-plaform tool called https://etcher.io/ that appears to work like a charm and has a status bar that kicks in after about a minute or two.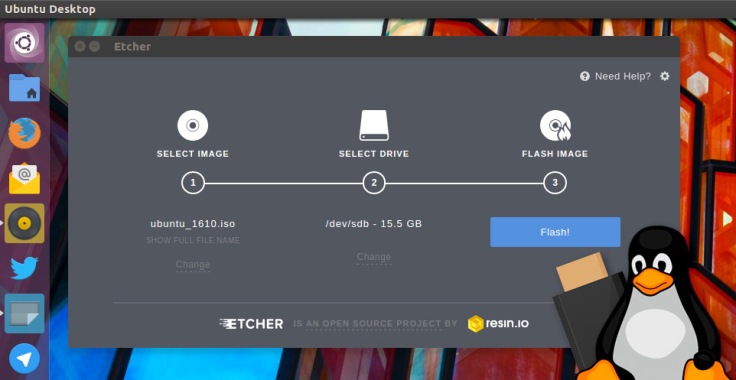
Really easy to use. Select the image you want to use, then select the target drive, then press “Flash!”. Supports Linux, Mac, and even Windows… some are even portable pkgs.
Anyways, download your favorite flavor of media center that RasPi3 can support and flash the SD card with it. I am currently using an 8GB media center image and takes about 15 minutes to flash.
Enjoy!
Apache Flink talk & presentation
This was a great intro to Apache Flink and comparisons to other technologies like Apache Hadoop MapReduce, Apache Storm, and Apache Spark. I am taking this with a grain of salt at the moment, until I can see it for myself though 🙂
The discussion at the end regarding this new player being widely adopted was very interesting also; some were hesitant to pick it up because of what they imagined to be only minor benefits and appeared that change just wasn’t in their future. I believe the more efficient technology will win as, what appear to be, minor efficiencies may be what allows for processing at the next jump in big data++. Exploding data could turn minor into a major win.
Additional references:
Infoworld article – Apache Flink: New Hadoop contender squares off against Spark
Data Artisans – High-throughput, low-latency, and exactly-once stream processing with Apache Flink
In my brief review of this “Comparison” (Overview Article), it appears that Apache Beam) does overtake Apache Spark with regards to programming-model. Lines of code are cut in half in most cases while accomplishing the same tasks. More diving is required of course, but looks like something to definitely watch out for.
A little background:
Apache Beam (formerly known as Dataflow) resonated from a unification of both batch and stream processing model.
Beam is modeled after the following technologies:
and is directly powered by FlumeJava and Millwheel.
Additional interesting references:

You must be logged in to post a comment.